Creating and Deploying Our First Microservices Locally
Table of Contents
microservices - This article is part of a series.
Goals#
As a review, here are our goals for this section:
We have everything we need to begin our journey. Let’s be clear about the first goals we want to achieve:
- Create two independent web api microservices
- These will begin by only serving static content with no database; we will expand them later
- Dockerize these two microservices
- Create Kubernetes manifests for these two microservices
- This will be done by creating HELM charts for these two microservices
- Initialize Skaffold with
skaffold initcli command - Update our
skaffold.yamlto work with helm - Deploy these two microservices to our local K8S cluster
Create Two Web APIs#
This will be simple; I’ll be executing in Rider, but regardless of your IDE you can take similar steps. Images will be pictured from Rider:
Create a new solution called
MicroservicesAndIdentityStarterto hold our microservices for this project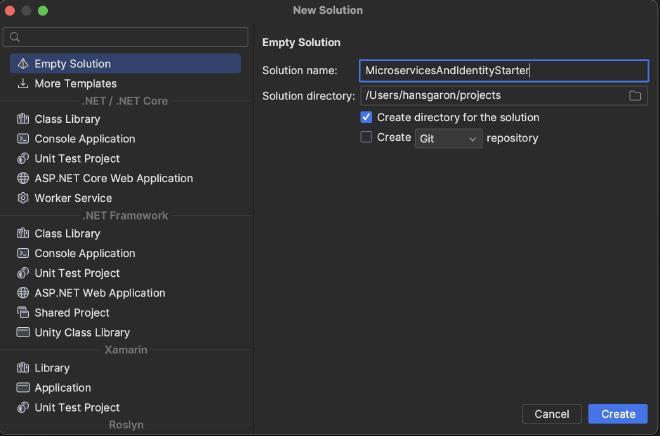
Create two new web api projects:
Identity.Service- Will be our central location for handling token authentication
- Will delegate to external auth providers as needed
- Will provide ability for users to create accounts via email / password
Users.Service- Will be where we keep non-auth related user profiles for our main application
At the time of writing .NET 8 is released, however I’ll be developing in .NET 7 and will update later (for expediency). You should have no issue starting straight away from .NET 8 though.
Be sure to choose No Authentication. Also, selecting Docker Support as Linux will dockerize these services out of the box: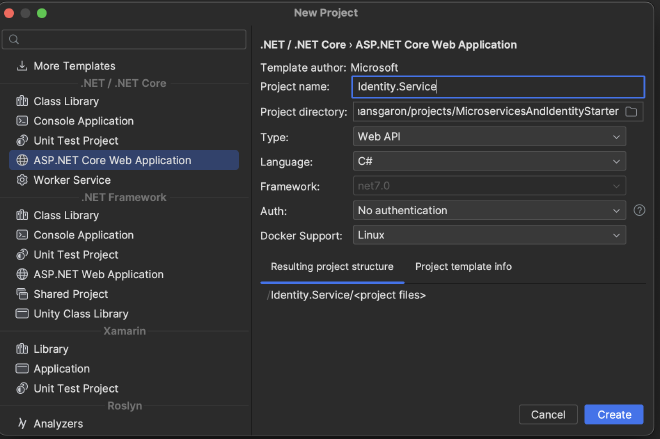
Update Web APIs To Serve Different Content#
We won’t be building any logic into these services yet; we will do that later. But we will test our different services and want to differentiate them based on their output. So, we will update them to serve different static content so we can tell which service we are hitting based in the response. This is necessary because we will set up an ingress / api gateway and want to be sure the gateway is hitting the correct service.
For both services:
- Delete the default
WeatherForecast.csmodel that was generated by app bootstrapping - Delete the default
WeatherForecastController.cscontroller that was generated by app bootstrapping
Identity.Service#
- Create a new controller in the
Controllersfolder calledAuthController.cs
using Microsoft.AspNetCore.Mvc;

namespace Identity.Service.Controllers;

[ApiController]
[Route("api/[controller]")]
public class AuthController : ControllerBase
{
    [HttpGet]
    public async Task<IActionResult> Get()
    {
        return Ok("Hi from Auth service");
    }
}
Users.Service#
- Create a new controller in the
ControllerscalledUsersController.cs
using Microsoft.AspNetCore.Mvc;

namespace Users.Service.Controllers;

[ApiController]
[Route("api/[controller]")]
public class UsersController : ControllerBase
{
    [HttpGet]
    public async Task<IActionResult> Get()
    {
        return Ok("Hi from Users service");
    }
}
Good, now we can differentiate our services based on their response when we test them later on. We will add logic to these later on, but for now this is sufficient.
Create Kubernetes Manifests#
Before we can initialize skaffold, we have to create K8S manifests. Since we will be using Helm to deploy our applications to K8S, we will create one Helm chart for each service. Helm then renders these charts to regular K8S manifests later.
Feel free to keep these K8S manifests wherever you want, but I will keep them in a folder called K8S/Helm that will be a peer of the folders containing each application. I will then add this folder to my current solution. The process for doing this while working in Rider is as follows (note that commands from command line are for unix operating systems):
- Open terminal at the root of your solution
- run
mkdir -p K8S/Helm(the-pparameter signals the command to make parent directories) - Right click on the solution name in Rider –> choose
Add->Existing Folder
- Add the K8S folder to the solution
- Don’t add the child
Helmfolder directly, as we want to keep the flexibility to add any other K8S manifests here later on in some other directory
- Don’t add the child
- Right click on
Helm->Add->Helm Chart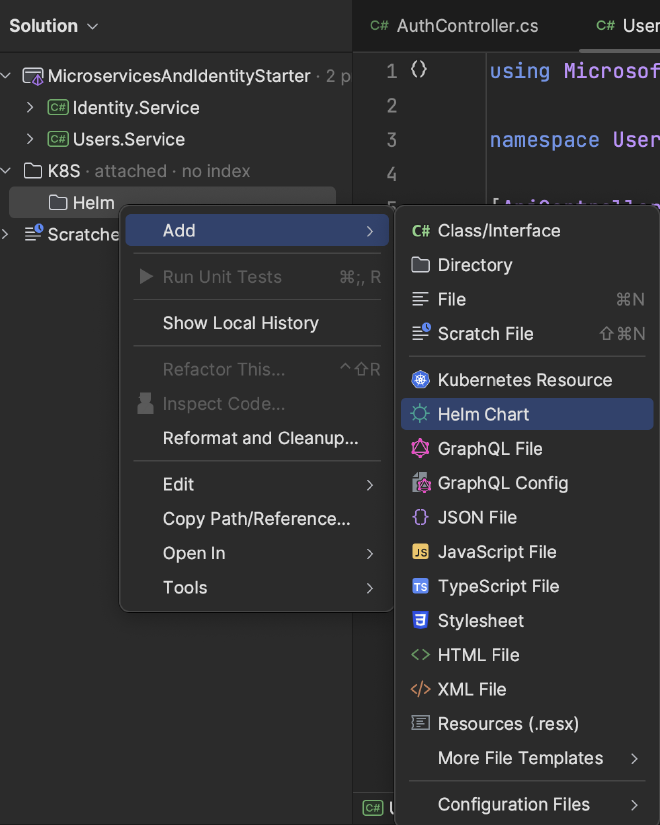
- Create one chart called
Identity - Create another chart called
Users
You should have something that looks like this: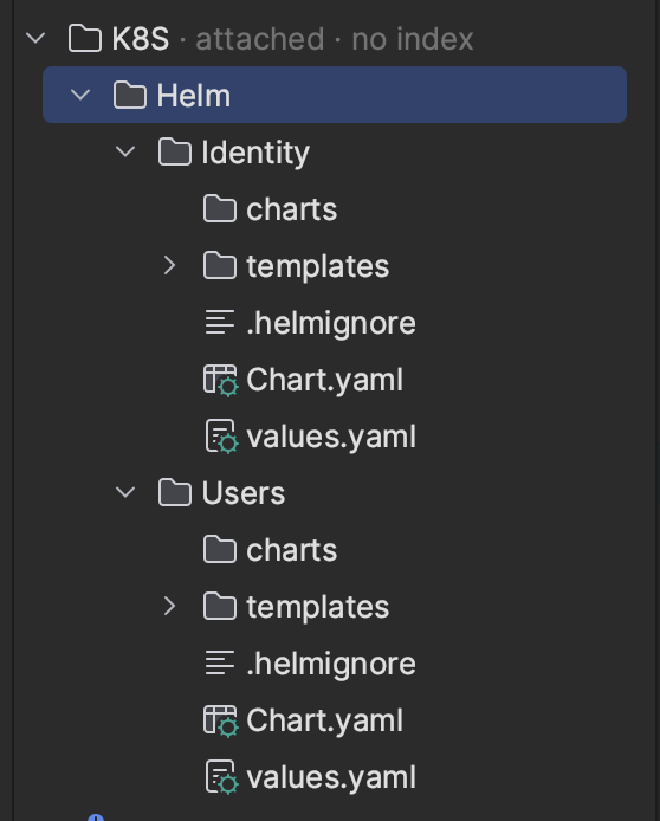
This has created a lot of things for us; the parts we are interested in right now are:
- A Kubernetes Deployment
- A Kubernetes Service
- The default created services are of type
ClusterIPlistening onhttpport80.
- The default created services are of type
These will be created for each application but we have to update values.yaml to deploy the correct docker image.
Update values.yaml#
I’ll assume you’re using Docker Hub to host your charts. For now, I will also assume they are hosted publicly. We can update this to a private registry later, but since this guide is on the internet, there’s no reason to keep them private for now. When you start putting your business logic in, you’ll want to protect your trade secrets with a private docker registry. That will be covered later on.
If you look in values.yaml right now, you’ll see the default charts were created to deploy nginx:
image:
  repository: nginx # <-- We need to change this to our image from docker hub
  pullPolicy: IfNotPresent
  # Overrides the image tag whose default is the chart appVersion.
  tag: ""
We want to deploy our applications instead by changing image.repository. Interestingly, we don’t need to push our image to docker hub while we are working locally; we just need to provide the correct location they will be in when we want to deploy to a cluster that’s not on our machine.
Images on docker hub are referenced in the following format:
username/image-name
So, since my username is hcgaron, and I want to call this image identity-service-starter, I will update it to hcgaron/identity-service-starter.
image:
  repository: hcgaron/identity-service-starter
  pullPolicy: IfNotPresent
  # Overrides the image tag whose default is the chart appVersion.
  tag: ""
Do the same for the users service values.yaml file:
image:
  repository: hcgaron/users-service-starter
  pullPolicy: IfNotPresent
  # Overrides the image tag whose default is the chart appVersion.
  tag: ""
With this in place, we have enough to initialize Skaffold.

Initialize Skaffold#
The Skaffold CLI can do the setup work for us. Open a terminal at the root of your solution and run skaffold init.
It’ll ask you about the source to build busybox because of some tests that were included by default when the helm charts were created. Since we don’t want to build from any of these sources locally, choose None:

For each individual application, choose Docker and the associated service Dockerfile. (You can choose Buildpacks if you want, but I am using Docker):

When it asks you about which builders you want to create K8S resources for, make sure everything is uncheked and hit enter (we want none):

You should now get a preview of your skaffold.yaml in the terminal with a prompt Do you want to write this configuration to skaffold.yaml? (y/N).
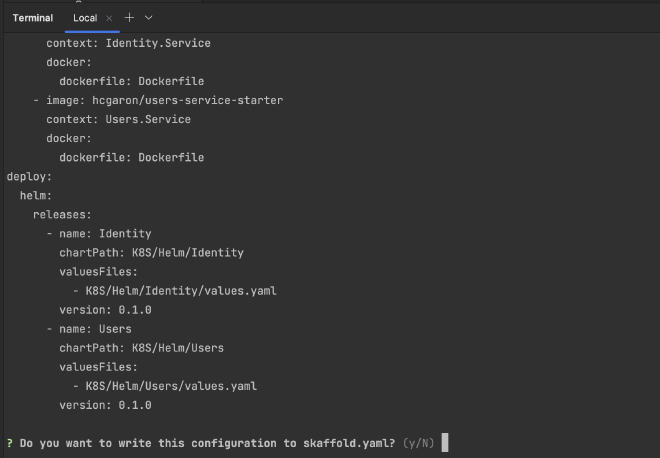
Choose y for yes and you’ll see your new file has been created at the root of the solution. Note that in Rider, you have to show hidden files to be able to see it in your directory: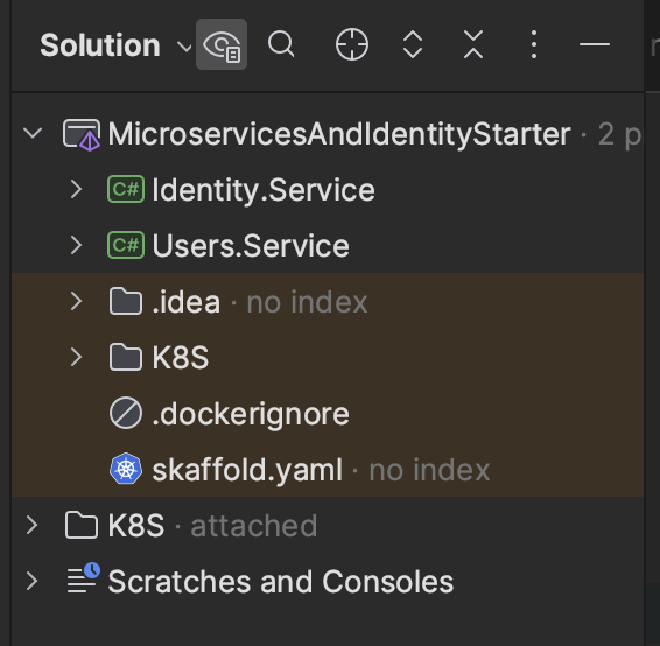
Fixing Skaffold yaml#
You would be forgiven to think you can run skaffold dev now and have things deployed into your local K8S cluster. Go ahead and try it (make sure K8S is enabled and running in your Docker Desktop first), and you’ll be greeted with an error:

If you fix this error, you’ll be greeted with a few other errors. We will fix them all now…
This error occurs because of the format of the bootstraped .NET Dockerfile and the auto generated skaffold.yaml, which aren’t playing nicely together. We need to change the build.artifacts section of our skaffold.yaml to reflect that we are running skaffold dev at the root of our solution, but the Dockerfiles are in each of the individual services. Update the build section of your skaffold.yaml to look like this:
build:
  artifacts:
    - image: hcgaron/identity-service-starter
      context: . # <-- this line was changed
      docker:
        dockerfile: Identity.Service/Dockerfile # <-- this line was changed
    - image: hcgaron/users-service-starter
      context: . # <-- this line was changed
      docker:
        dockerfile: Users.Service/Dockerfile # <-- this line was changed
With these changes, skaffold can build from the root and find the appropriate dockerfiles in each service.
Ready to try it out? NO! Still more problems!
Run skaffold dev again to be greeted with this:

This is because we can’t have uppercase letters in our helm release names. These were auto generated by skaffold; let’s update them to be lowercase. Update the deploy section of your skaffold.yaml to the following:
deploy:
  helm:
    releases:
      - name: identity # <-- this line was changed
        chartPath: K8S/Helm/Identity
        valuesFiles:
          - K8S/Helm/Identity/values.yaml
        version: 0.1.0
      - name: users # <-- this line was changed
        chartPath: K8S/Helm/Users
        valuesFiles:
          - K8S/Helm/Users/values.yaml
        version: 0.1.0
Try skaffold dev again – more errors 🫠

Fixing Helm Charts#

This is because helm created a ServiceAccount for us with an invalid name (an uppercase letter). To fix this, go to Chart.yaml in both applications and change the name from Identity to identity and Users to users:
apiVersion: v2
name: users # <-- this line was changed
apiVersion: v2
name: identity # <-- this line was changed
If you run skaffold dev you’ll notice things seem to start up, but your pods will keep dying after 30 seconds or so (eventually everything will be aborted and fail), and you’ll see this in your terminal:

This is because the deployment.yaml templates in the auto-generated Helm charts each contain a readinessProbe and a livenessProbe that points to /.
The livenessProbe is used to check if the container is alive or operational. If the livenessProbe fails, Kubernetes considers the pod unhealthy and attempts to restart it (hence why your pods keep dying / restarting).
On the other hand, the readinessProbe is used to check if the container is ready to serve incoming traffic. If the readinessProbe fails, Kubernetes isolates the pod, preventing it from receiving more incoming traffic. Once a subsequent probe succeeds, Kubernetes identifies the pod as healthy and resumes incoming traffic flow.
The problem here is we don’t serve anything at the / path of these services! We have two options:
- implement a health check endpoint in each service and update our probes to point there
- point the probes to our existing endpoints
Let’s implement the health check endpoint in each service and point our probes there.
Health Check Service Endpoints#
Create a new controller for each of the services and replate the file contents with the simple controller below (just change the namespace to match whichever app you are in):
using Microsoft.AspNetCore.Mvc;

namespace Identity.Service.Controllers;

[ApiController]
[Route("api/[controller]")]
public class HealthCheck: ControllerBase
{
    [HttpGet]
    public IActionResult HealthCheckProbe()
    {
        return Ok();
    }
}
Now find the deployment.yaml file in the templates folder of both Helm charts and update the livenessProbe and readinessProbe sections:
          livenessProbe:
            httpGet:
              path: /api/HealthCheck # <-- this line changed
              port: http
          readinessProbe:
            httpGet:
              path: /api/HealthCheck # <-- this line changed
              port: http
Run skaffold dev again and it will succeed! (Some warnings show up; we’ll clean that up in a minute):
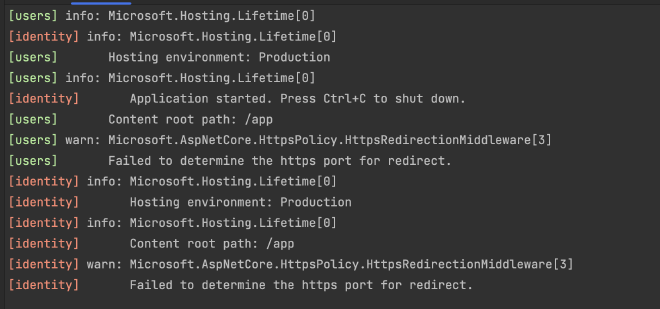
This is all we need to start developing! But technically we haven’t done all our homework yet. We haven’t updated our skaffold.yaml to work with Helm. I am debating the need for this, depending on what our workflow will be to push to production (we have many options), but let’s do one last update to our skaffold.yaml to follow the practice they suggest so we are (somewhat) ready for later down the line.
Update skaffold.yaml to work with Helm#
The Skaffold docs make note on how to configure the image so that Skaffold can track the image being built and tell Helm which image to to use to deploy. This doesn’t really matter locally because we are just using the local files and building the images here, but it’ll matter upon deploy.
Note that the image key must be configured in skaffold.yaml. Update the deploy section in your skaffold.yaml to the following:
deploy:
  helm:
    releases:
      - name: identity
        setValueTemplates: # <-- section added
          image.repository: "{{.IMAGE_REPO_hcgaron_identity_service_starter}}"
          image.tag: "{{.IMAGE_TAG_hcgaron_identity_service_starter}}@{{.IMAGE_DIGEST_hcgaron_identity_service_starter}}"
        setValues: # <-- section added
          image.pullPolicy: "IfNotPresent"
        chartPath: K8S/Helm/Identity
        valuesFiles:
          - K8S/Helm/Identity/values.yaml
        version: 0.1.0
      - name: users
        setValueTemplates: # <-- section added
          image.repository: "{{.IMAGE_REPO_hcgaron_users_service_starter}}"
          image.tag: "{{.IMAGE_TAG_hcgaron_users_service_starter}}@{{.IMAGE_DIGEST_hcgaron_users_service_starter}}"
        setValues: # <-- section added
          image.pullPolicy: "IfNotPresent"
        chartPath: K8S/Helm/Users
        valuesFiles:
          - K8S/Helm/Users/values.yaml
        version: 0.1.0
Run skaffold dev, take a deep breath, and tell yourself “life is good!”

Cleanup#
Let’s clean up one last thing – our app currently displays these warnings:
We can turn off these warnings by disabling the HttpsRedirect that was enabled by default for our app, since we will be using linkerd as a sidecar proxy to terminate tls.
In Program.cs comment out app.UseHttpsRedirection() and we are done!

Next Steps#
We now have a (local) Kubernetes cluster, two (benign) services, Helm charts for our resources, and skaffold up and running, configured to work with Helm. The work we’ve put in will pay dividends later as we dig into business logic and add more services, but we still have ground work to do.
We currently have no way to access our services from outside the cluster. Next we will:
- Deploy
ingress-nginxinto our local cluster - Add a BFF service (reverse proxy) implemented for a
webfrontend with YARP- Right now, we don’t have any requests to aggregate, so this will just be a reverse proxy for now
- Having this infrastructure in place will allow us to extend it later on with lower overhead
After we do this, we can test a couple of API requests to our services, then we can mesh them with linkerd!
Let’s dive in!