The Right Development Environment Eases the Pain
Table of Contents
microservices - This article is part of a series.
Development Should Resemble Production#
In this step we want to choose the right set of tools and set up the right development environment so that our dev environment will be as close as possible to production.
One pattern you’ll notice after scouring the internet for documentation, tutorials, guides, video courses, etc… is that there are many quotes like:
This is not production ready code. In production do [something better].
Wow, super helpful!
Or, you might find things like:
Prerequisites:
- A million things you don’t have
- This won’t help you if you’re starting a new project…
Ok, clearly I’m being tongue-in-cheek but you have no doubt seen similar to one or both of the above.
The problem is that most resources focus on one environment to the detriment of all others. This isn’t entirely obvious from reading those articles at first blush, but when you come to deploy your application it becomes clear that maintaining your dev vs your production environment introduces significant overhead, often enough to warrant its own team for larger enterprises!
So, to ease the pain, we will focus on getting a development environment as close to production as possible. Yes, there will be differences when we deploy later on, but our development cycle will be much tighter with fewer pain points.
Docker#
We will be building docker images and deploying into a Kubernetes cluster. As a result, you’ll need to install Docker Desktop. There are other tools available to run docker containers, but Docker Desktop makes things very simple, including starting a Kubernetes cluster at the push of a button.
You can also switch out Docker Desktop down the line for another solution that will enable you to run docker such as Colima, but note that there might be a couple of steps in changing your setup. These, however, will not make a difference in our end-to-end setup.
Kubernetes#
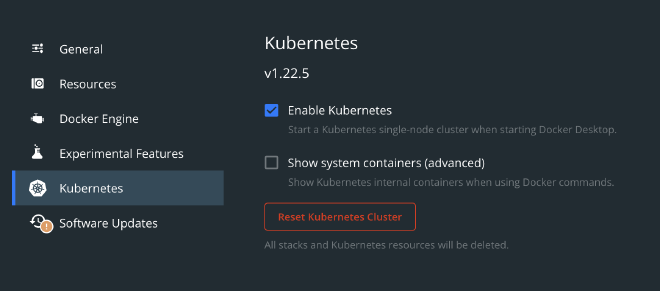
We get an easy (single node) Kubernetes cluster that we can turn on just by checking a box in Docker Desktop.
After enabling Kubernetes and restarting Docker Desktop, confirm you have kubectl installed by entering kubectl into a new terminal.
Skaffold#
Skaffold is basically a wrapper around Kubernetes. It helps you manage your Kubernetes workflow and can do a lot of cool things. We will use it to make developing on a local Kubernetes cluster much more natural. Specifically, it will alleviate us from the need to:
- deploy a local docker registry (into our container or on our machine)
- push image changes to docker hub every time we want to update our code
It’ll handle the build and deploy of images locally as we save files (ie. hot reload), lets us set up profiles for different environments, and just makes the full experience more manageable. In my opinion, this is one of the most important and overlooked tools for tightening the development loop in distributed applications. There are other options, mainly DevSpace and Tilt, and I’m sure by the time I finish this series I’ll probably have switched to one of them, but Skaffold has supported all my needs for projects in the past and struck the balance I needed.
If you haven’t already, go download the Skaffold CLI for your OS.
HELM#
We will be creating Helm charts for our resources so you’ll need to install Helm locally for your OS.
Dotnet#
Since we’ll be creating some dotnet microservices, you’ll want to install dotnet for your OS:
IDE#
Use whatever IDE you feel comfortable with, but for the record I’ll be using Rider by JetBrains. Screenshots will be Rider specific (sorry, but this is a chronicle that most likely only I will read in the future as a reference), so you may need to find comparable options in your IDE.
I’ve noticed that VSCode has somewhat better K8S plugin support than Rider, so at times I may switch to that when working on K8S manifests or Helm charts (although, Helm chart scaffolding is quite good in Rider).
Next Steps#
We have everything we need to begin our journey. Let’s be clear about the first goals we want to achieve:
- Create two independent web api microservices
- These will begin by only serving static content with no database; we will expand them later
- Dockerize these two microservices
- Create Kubernetes manifests for these two microservices
- This will be done by creating HELM charts for these two microservices
- Initialize Skaffold with
skaffold initcli command - Update our
skaffold.yamlto work with helm - Deploy these two microservices to our local K8S cluster
Let’s cover these in the next step.
